As an exercise, let’s look at an existing app and try to understand how cell prototypes are used in the screenshot below.

The first cell might actually be a custom header. But it has a row separator below it, so we can be sure it’s a cell (unless the developers chose to manually add the separator below the header.)
The second cell seems to have a paginated scroll view inside its content view, but that’s a story for another time.
The following cells seem to have the same layout, but with different content. This is a clue that only one prototype is being used for instantiating these cells.
Let’s try to recreate that in Interface Builder.

Phew! Let’s try running it!

Why aren’t there any rows in the table? When using a UITableViewController in IB, “dynamic prototypes” is the default choice for the table’s content.

If we would select “static cells” and run the app again, then we would see the three cells, as expected. But we need 5 cells in total, out of which 3 are based on the same prototype. We will use three prototypes from which we can instantiate 3 types of cells, to create those 5 cells.
So what’s next? We have to add code that instantiates the cells.
Let’s use a data source array which contains multiple instances of “view models” — objects that encapsulate values needed to configure the cells. This pattern is easy to learn and I think code that follows the pattern is easy to maintain and extend.
The final result:

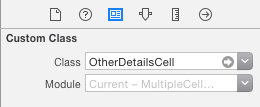
Note: Don’t forget to set the class and identifiers for the cells in IB: